测试
简介
测试可以确保你的应用程序按你预期的方式工作,尤其是在你的代码库随着时间推移而发生变化时。如果你有良好的测试,你可以放心地重构和重写代码。测试也是预期行为最具体的文档形式,因为其他开发人员可以通过阅读测试来弄清楚如何使用你的代码。
自动化测试至关重要,因为它允许你比手动运行更多测试,并且频率更高,从而允许你立即捕获回归错误。
测试类型
关于测试主题已经写了很多书,所以我们在这里将介绍一些测试的基础知识。编写测试时需要考虑的重要事项是你要测试应用程序的哪一部分,以及如何验证行为是否有效。
**单元测试**: 如果你正在测试应用程序的一个小模块,那么你正在编写单元测试。你需要 *模拟* 和 *模拟* 其他模块,这些模块通常用于你的模块,以便 *隔离* 每个测试。你通常还需要 *监视* 模块采取的操作,以验证它们是否发生。
**集成测试**: 如果你正在测试多个模块是否能够协同工作,那么你正在编写集成测试。此类测试更加复杂,可能需要在客户端和服务器上运行代码,以验证跨越该界面的通信是否按预期工作。通常,集成测试仍会隔离整个应用程序的一部分,并直接在代码中验证结果。
**验收测试**: 如果你想编写一个可以针对应用程序的任何运行版本运行的测试,并在浏览器级别验证在按下正确的按钮时是否发生了正确的事情,那么你正在编写验收测试(有时称为“端到端测试”)。此类测试通常尽量减少与应用程序的交互,除了可能设置正确的数据以针对其运行测试之外。
**负载测试**: 最后,你可能希望测试你的应用程序在典型负载下是否有效,或者查看它在崩溃之前可以承受多少负载。这称为负载测试或压力测试。此类测试可能难以设置,并且通常不经常运行,但在大型生产发布之前对建立信心非常重要。
Meteor 中测试的挑战
在大多数方面,测试 Meteor 应用程序与测试任何其他完整堆栈 JavaScript 应用程序没有什么不同。但是,与更传统的专注于后端或前端的框架相比,有两个因素可能使测试变得更具挑战性
**客户端/服务器数据**: Meteor 的数据系统使得跨越客户端-服务器鸿沟成为可能,并且通常允许你构建应用程序而无需考虑数据是如何移动的。验证你的代码是否确实跨越了这个鸿沟正确工作变得至关重要。在传统的框架中,你花费大量时间考虑客户端和服务器之间的接口,你通常可以单独测试接口的两侧,但 Meteor 的 完整应用程序测试模式 使得编写 集成测试 涵盖整个堆栈成为可能。另一个挑战是在客户端上下文中创建测试数据;我们将在下面的 生成测试数据部分 中讨论如何做到这一点。
**反应性**: Meteor 的反应性系统在某种意义上是“最终一致的”,即当你更改系统的反应性输入时,你会在一段时间后看到用户界面发生变化以反映这一点。这在测试时可能是一个挑战,但有一些方法可以等待这些更改发生以验证结果,例如
Tracker.afterFlush()。
'meteor test' 命令
在 Meteor 中测试应用程序的主要方法是 meteor test 命令。
这会以特殊的“测试模式”加载你的应用程序。它的作用是
- *不会* 积极加载任何我们的应用程序代码,就像 Meteor 通常那样。
- 这是一个非常重要的说明,因为除非你在测试文件中导入它们,否则 Meteor 不会知道任何方法/集合/发布。
- *会* 积极加载应用程序中(包括
imports/文件夹中)任何看起来像*.test[s].*或*.spec[s].*的文件 - 将
Meteor.isTest标志设置为 true。 - 启动测试驱动程序包(见下文)。
Meteor 构建工具 和
meteor test命令会忽略位于任何tests/目录中的任何文件。这允许你将测试放在此目录中,你可以使用 Meteor 内置测试工具之外的测试运行程序运行这些测试,并且这些文件仍然不会加载到你的应用程序中。请参阅 Meteor 的 默认文件加载顺序 规则。
这意味着你可以使用某种文件名模式在文件中编写测试,并知道它们不会包含在应用程序的正常构建中。当你的应用程序在测试模式下运行时,这些文件将被加载(并且不会加载其他任何内容),并且它们可以导入你想要测试的模块。正如我们将看到的,这非常适合 单元测试 和 简单的集成测试。
此外,Meteor 提供了一种“完整应用程序”测试模式。你可以使用 meteor test --full-app 运行它。
这类似于测试模式,但有一些关键区别
- 它加载与
*.app-test[s].*和*.app-spec[s].*匹配的测试文件。 - 它**会**积极加载我们的应用程序代码,就像 Meteor 通常那样。
- 将
Meteor.isAppTest标志设置为 true(而不是Meteor.isTest标志)。
这意味着你的整个应用程序(包括例如 Web 服务器和客户端路由器)都将加载并按正常方式运行。这使你能够编写更复杂的 集成测试,并加载其他文件以进行 验收测试。
请注意,Meteor 工具中还有另一个测试命令;meteor test-packages 是一种测试 Atmosphere 包的方法,这在 编写包文章 中有讨论。
驱动程序包
当你运行 meteor test 命令时,必须提供 --driver-package 参数。测试驱动程序是一个小型应用程序,它代替你的应用程序运行,并运行你定义的每个测试,同时以某种用户界面报告结果。
主要有两种测试驱动程序包
- **Web 报告程序**: Meteor 应用程序,显示一个特殊的测试报告 Web UI,你可以在其中查看测试结果。
- **控制台报告程序**: 这些完全在命令行上运行,主要用于像 持续集成 这样的自动化测试。
推荐:Mocha
在本文中,我们将使用流行的 Mocha 测试运行程序。你可以将其与任何你想要的断言库配对,例如 Chai 或 expect。为了在 Mocha 中编写和运行测试,我们需要添加一个合适的测试驱动程序包。
有几个选项。选择适合你的应用程序的选项。你可能依赖多个选项,并为不同的情况设置不同的测试命令。
- meteortesting:mocha 运行客户端和/或服务器包或应用程序测试,并在服务器控制台中报告所有结果。支持各种浏览器以运行客户端测试,包括 PhantomJS、Selenium ChromeDriver 和 Electron。可用于在 CI 服务器上运行测试。具有监视模式。
这些包在开发或生产模式下不执行任何操作。它们声明自己是 testOnly,因此它们甚至不会在测试之外加载。但是,当我们的应用程序在 测试模式 下运行时,测试驱动程序包接管,在客户端和服务器上执行测试代码,并将结果呈现到浏览器。
以下是如何将 meteortesting:mocha 包添加到我们的应用程序中
meteor add meteortesting:mocha
测试文件
测试文件本身(例如名为 todos-item.test.js 或 routing.app-specs.coffee 的文件)可以通过测试库的常用方式注册自己以由测试驱动程序运行。对于 Mocha,这是通过使用 describe 和 it 来实现的。
describe('my module', function () {
  it('does something that should be tested', function () {
    // This code will be executed by the test driver when the app is started
    // in the correct mode
  })
})
请注意,不建议在 Mocha 中使用箭头函数 。
测试数据
当你的应用程序在测试模式下运行时,它将使用干净的测试数据库进行初始化。
如果你正在运行依赖于使用数据库的测试,特别是数据库的内容,则需要在测试中执行一些 *设置* 步骤以确保数据库处于你期望的状态。
import { Meteor } from 'meteor/meteor';
import expect from 'expect';

import { Notes } from './notes';

 describe('notes', function () {
   const noteOne = {
     _id: 'testNote1',
     title: 'Groceries',
     body: 'Milk, Eggs and Oatmeal'
   };

   beforeEach(function () {
     Notes.remove({});
     Notes.insert(noteOne);
   });
    ...
你还可以使用 xolvio:cleaner,它对于重置整个数据库非常有用,如果你希望这样做的话。你可以在 beforeEach 块中使用它来重置数据库
import { resetDatabase } from 'meteor/xolvio:cleaner';

describe('my module', function () {
  beforeEach(function () {
    resetDatabase();
  });
});
此技巧仅适用于服务器端。如果您需要从客户端测试重置数据库,xolvio:cleaner 提供了一个名为 xolvio:cleaner/resetDatabase 的内置方法。
describe('my module', function (done) {
  beforeEach(function (done) {
    // We need to wait until the method call is done before moving on, so we
    // use Mocha's async mechanism (calling a done callback)
    Meteor.call('xolvio:cleaner/resetDatabase', done);
  });
});
您也可以在方法中调用 resetDatabase,如果您想在之前或之后应用自定义代码。
import { resetDatabase } from 'meteor/xolvio:cleaner';

// NOTE: Before writing a method like this you'll want to double check
// that this file is only going to be loaded in test mode!!
Meteor.methods({
  'test.resetDatabase': () => {
    // custom code goes here...
    resetDatabase()
    // or here
  }
});
由于我们将上面的代码放在了一个测试文件中,因此它不会在正常的开发或生产模式下加载(这将是一件非常糟糕的事情!)。如果您使用类似功能创建了一个 Atmosphere 包,则应将其标记为 testOnly,它也只会加载到测试模式。
生成测试数据
通常,创建一个数据集来运行您的测试是明智的。您可以对集合使用标准的 insert() 调用来执行此操作,但通常创建工厂更容易,这有助于编码随机测试数据。一个很棒的用于执行此操作的包是 dburles:factory。
在 Todos 示例应用程序中,我们定义了一个工厂来描述如何使用 faker npm 包创建测试待办事项。
import faker from '@faker-js/faker';

Factory.define('todo', Todos, {
  listId: () => Factory.get('list'),
  text: () => faker.lorem.sentence(),
  createdAt: () => new Date(),
});
要在测试中使用工厂,我们调用 Factory.create。
// This creates a todo and a list in the database and returns the todo.
const todo = Factory.create('todo');

// If we have a list already, we can pass in the id and avoid creating another:
const list = Factory.create('list');
const todoInList = Factory.create('todo', { listId: list._id });
模拟数据库
由于 Factory.create 直接将文档插入到传递到 Factory.define 函数中的集合中,因此在客户端使用它可能会成为一个问题。但是,您可以使用一个巧妙的隔离技巧来替换服务器端支持的 Todos 客户端集合,并使用一个模拟的 本地集合,该集合编码在 hwillson:stub-collections 包中。
import StubCollections from 'meteor/hwillson:stub-collections';
import { Todos } from 'path/to/todos.js';

StubCollections.stub(Todos);

// Now Todos is stubbed to a simple local collection mock,
//   so for instance on the client we can do:
Todos.insert({ a: 'document' });

// Restore the `Todos` collection
StubCollections.restore();
在 Mocha 测试中,在 beforeEach/afterEach 块中使用 stub-collections 是有意义的。
单元测试
单元测试是隔离一段代码,然后测试该部分的内部是否按预期工作。由于 我们将代码库拆分成了 ES2015 模块,因此自然会逐个测试这些模块。
通过隔离一个模块并测试其内部功能,我们可以编写快速且准确的测试——它们可以快速告诉您应用程序中问题所在。但是请注意,不完整的单元测试通常会隐藏错误,因为它们会以某种方式模拟依赖项。因此,将单元测试与较慢(并且可能运行频率较低)的集成和验收测试结合起来很有用。
一个简单的 Blaze 单元测试
在 Todos 示例应用程序中,由于我们将用户界面拆分成了 智能且可重用的组件,因此自然希望对一些可重用组件进行单元测试(我们将在下面看到如何对我们的智能组件进行 集成测试)。
为此,我们将使用一个非常简单的测试助手,该助手使用给定的数据上下文在屏幕外渲染 Blaze 组件。由于我们将其放在 imports 中,因此它不会在我们的应用程序中以正常模式加载(因为它在任何地方都不需要)。
import isString from 'lodash.isstring';
import { Template } from 'meteor/templating';
import { Blaze } from 'meteor/blaze';
import { Tracker } from 'meteor/tracker';

const withDiv = function withDiv(callback) {
  const el = document.createElement('div');
  document.body.appendChild(el);
  try {
    callback(el);
  } finally {
    document.body.removeChild(el);
  }
};

export const withRenderedTemplate = function withRenderedTemplate(template, data, callback) {
  withDiv((el) => {
    const ourTemplate = isString(template) ? Template[template] : template;
    Blaze.renderWithData(ourTemplate, data, el);
    Tracker.flush();
    callback(el);
  });
};
要测试的可重用组件的一个示例是 Todos_item 模板。这是一个单元测试的示例(您可以在 应用程序存储库中的其他一些示例)。
imports/ui/components/client/todos-item.tests.js:
/* eslint-env mocha */
/* eslint-disable func-names, prefer-arrow-callback */

import { Factory } from 'meteor/dburles:factory';
import chai from 'chai';
import { Template } from 'meteor/templating';
import $ from 'jquery';
import { Todos } from '../../../api/todos/todos';


import { withRenderedTemplate } from '../../test-helpers.js';
import '../todos-item.js';

describe('Todos_item', function () {
  beforeEach(function () {
    Template.registerHelper('_', key => key);
  });

  afterEach(function () {
    Template.deregisterHelper('_');
  });

  it('renders correctly with simple data', function () {
    const todo = Factory.build('todo', { checked: false });
    const data = {
      todo: Todos._transform(todo),
      onEditingChange: () => 0,
    };

    withRenderedTemplate('Todos_item', data, el => {
      chai.assert.equal($(el).find('input[type=text]').val(), todo.text);
      chai.assert.equal($(el).find('.list-item.checked').length, 0);
      chai.assert.equal($(el).find('.list-item.editing').length, 0);
    });
  });
});
此测试中特别需要注意的是以下内容
导入
当我们在测试模式下运行我们的应用程序时,只有我们的测试文件会被急切地加载。特别是,这意味着为了使用我们的模板,我们需要导入它们!在此测试中,我们导入了 todos-item.js,它本身导入了 todos.html(是的,您确实需要导入 Blaze 模板的 HTML 文件!)。
存根
为了成为单元测试,我们必须模拟模块的依赖项。在这种情况下,由于我们将代码隔离到可重用组件的方式,因此没有太多工作要做;主要我们需要模拟由 tap:i18n 系统创建的 {{_}} 助手。请注意,我们在 beforeEach 中模拟它,并在 afterEach 中恢复它。
如果您正在测试使用全局变量的代码,则需要导入这些全局变量。例如,如果您有一个全局 Todos 集合并且正在测试此文件
// logging.js
export function logTodos() {
  console.log(Todos.findOne());
}
那么您需要在该文件和测试中都导入 Todos。
// logging.js
import { Todos } from './todos.js'
export function logTodos() {
  console.log(Todos.findOne());
}
// logging.test.js
import { Todos } from './todos.js'
Todos.findOne = () => {
  return {text: "write a guide"}
}

import { logTodos } from './logging.js'
// then test logTodos
...
创建数据
我们可以使用 Factory 包的 .build() API 创建一个测试文档,而无需将其插入任何集合中。由于我们一直小心地避免直接调用任何集合,因此我们可以将构建的 todo 文档直接传递到模板中。
一个简单的 React 单元测试
我们还可以将相同的结构应用于测试 React 组件,并推荐使用 Enzyme 包,该包模拟 React 组件的环境并允许您使用 CSS 选择器查询它。在 Todos 应用程序的 react 分支 中提供了一套更大的测试,但现在让我们看一个简单的示例。
import { Factory } from 'meteor/dburles:factory';
import React from 'react';
import { shallow } from 'enzyme';
import chai from 'chai';
import TodoItem from './TodoItem.jsx';

describe('TodoItem', () => {
  it('should render', () => {
    const todo = Factory.build('todo', { text: 'testing', checked: false });
    const item = shallow(<TodoItem todo={todo} />);
    chai.assert(item.hasClass('list-item'));
    chai.assert(!item.hasClass('checked'));
    chai.assert.equal(item.find('.editing').length, 0);
    chai.assert.equal(item.find('input[type="text"]').prop('defaultValue'), 'testing');
  });
});
与上面的 Blaze 版本相比,该测试稍微简单一些,因为 React 示例应用程序未进行国际化。否则,它在概念上是相同的。我们使用 Enzyme 的 shallow 函数渲染 TodoItem 组件,并使用结果对象查询文档,以及模拟用户交互。以下是如何模拟用户选中待办事项的示例。
import { Factory } from 'meteor/dburles:factory';
import React from 'react';
import { shallow } from 'enzyme';
import sinon from 'sinon';
import TodoItem from './TodoItem.jsx';
import { setCheckedStatus } from '../../api/todos/methods.js';

describe('TodoItem', () => {
  it('should update status when checked', () => {
    sinon.stub(setCheckedStatus, 'call');
    const todo = Factory.create('todo', { checked: false });
    const item = shallow(<TodoItem todo={todo} />);

    item.find('input[type="checkbox"]').simulate('change', {
      target: { checked: true },
    });

    sinon.assert.calledWith(setCheckedStatus.call, {
      todoId: todo._id,
      newCheckedStatus: true,
    });

    setCheckedStatus.call.restore();
  });
});
在这种情况下,TodoItem 组件在用户点击时调用一个 Meteor 方法 setCheckedStatus,但这是一个单元测试,因此没有运行的服务器。因此,我们使用 Sinon 模拟它。模拟点击后,我们验证存根是否使用正确的参数被调用。最后,我们清理存根并恢复原始方法行为。
运行单元测试
要运行我们的应用程序定义的测试,我们以 测试模式 运行我们的应用程序。
TEST_WATCH=1 meteor test --driver-package meteortesting:mocha
由于我们定义了一个测试文件(imports/todos/todos.tests.js),这意味着上面的文件将被急切地加载,将 'builds correctly from factory' 测试添加到 Mocha 注册表中。
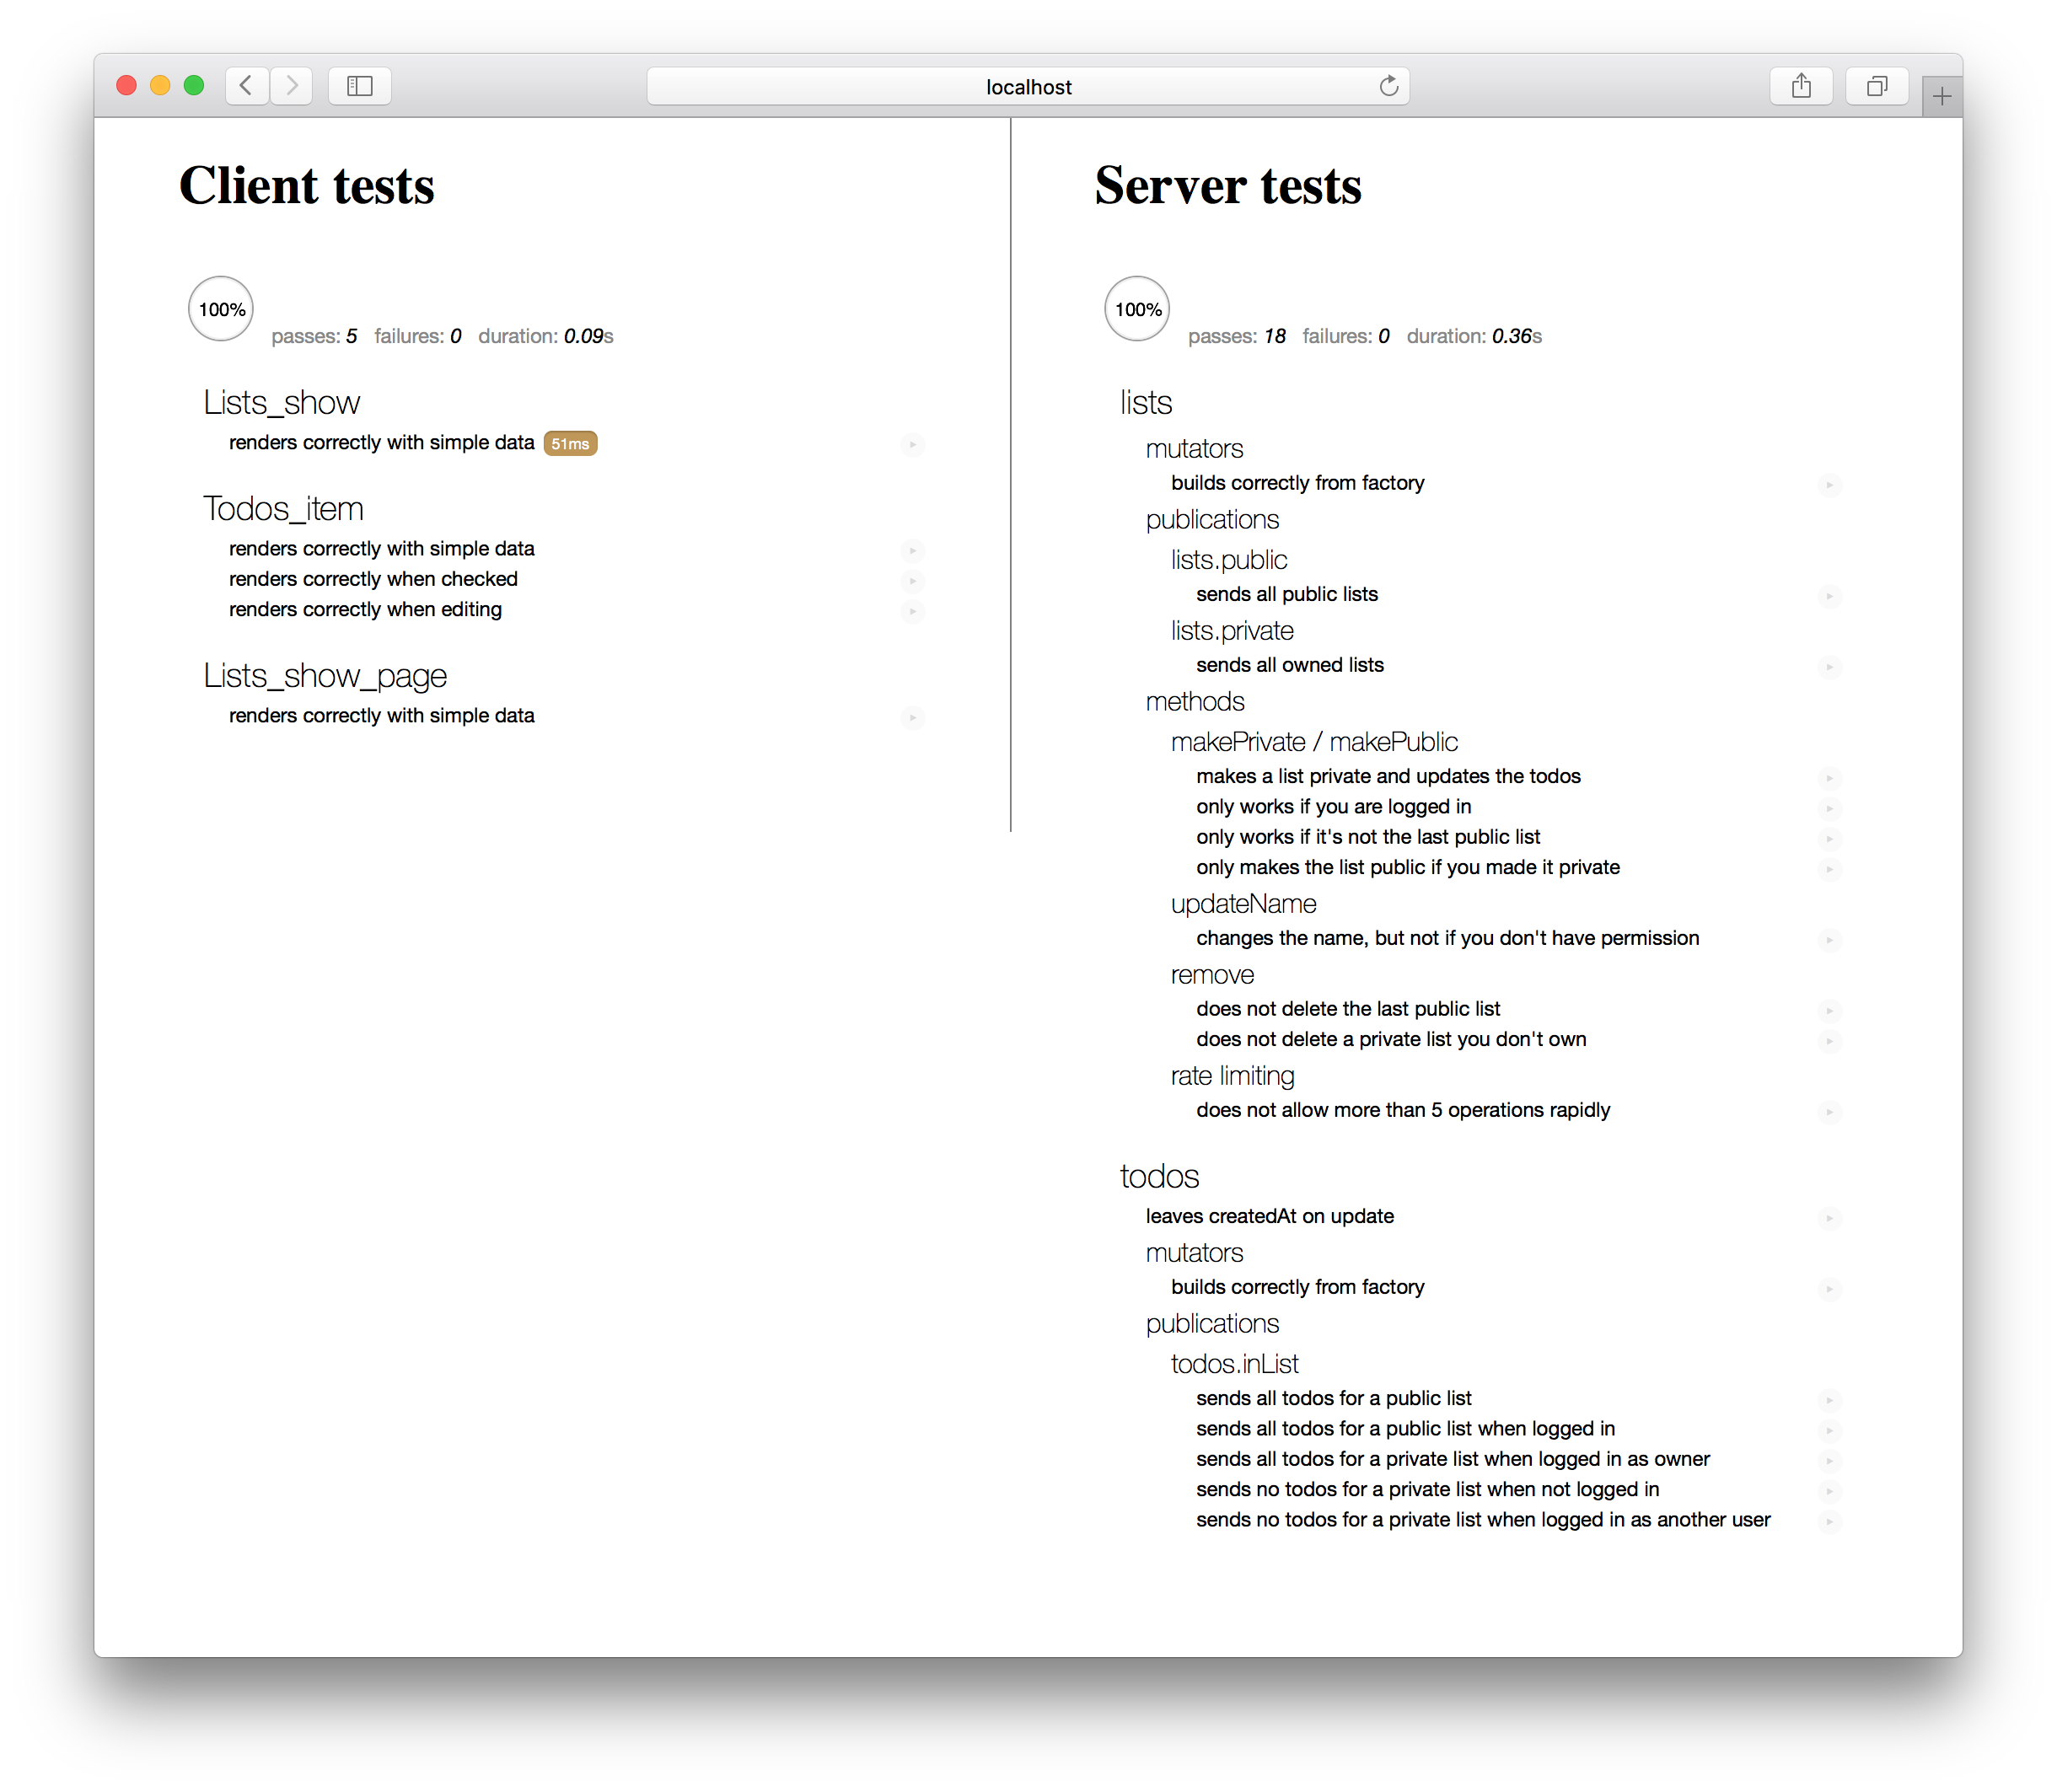
要运行测试,请在浏览器中访问 https://:3000。这将启动 meteortesting:mocha,它将在浏览器和服务器上运行您的测试。它将在 ID 为 mocha 的 div 中显示测试结果。
通常,在开发应用程序时,在第二个端口(例如 3100)上运行 meteor test 是有意义的,同时也在单独的进程中运行主应用程序。
# in one terminal window
meteor

# in another
meteor test --driver-package meteortesting:mocha --port 3100
然后,您可以打开两个浏览器窗口以查看应用程序的运行情况,同时确保在您进行更改时不会破坏任何测试。
隔离技术
在 上面的单元测试 中,我们看到了一个非常有限的示例,说明如何将模块与更大的应用程序隔离。这对正确的单元测试至关重要。其他一些实用程序和技术包括
velocity:meteor-stubs包,它为大多数 Meteor 核心对象创建简单的存根。我们在 上面 提到的
hwillson:stub-collections包。
对于更好的隔离和测试实用程序,还有很多空间。
测试发布
例如,让我们以这个简单的发布为例
// server/publications/notes
 Meteor.publish('user.notes', function () {
    return Notes.find({ userId: this.userId });
  });
我们使用 Meteor.server.publish_handlers 访问 Meteor 发布,然后使用 .apply 提供发布所需的参数并测试其返回值。
import { Meteor } from 'meteor/meteor';
import expect from 'expect';

import { Notes } from './notes';

 describe('notes', function () {
   const noteOne = {
     _id: 'testNote1',
     title: 'Groceries',
     body: 'Milk, Eggs and Oatmeal'
     userId: 'userId1'
   };

   beforeEach(function () {
     Notes.remove({});
     Notes.insert(noteOne);
   });

 it('should return a users notes', function () {
      const res = Meteor.server.publish_handlers['user.notes'].apply({ userId: noteOne.userId });
      const notes = res.fetch();

      expect(notes.length).toBe(1);
      expect(notes[0]).toEqual(noteOne);
    });

  it('should return no notes for user that has none', function () {
      const res = Meteor.server.publish_handlers.notes.apply({ userId: 'testid' });
      const notes = res.fetch();

      expect(notes.length).toBe(0);
    });
 });
一个用于测试发布的有用包是 johanbrook:publication-collector,它允许您测试单个发布的输出,而无需创建传统的订阅。
describe('notes', function () {
  it('should return a users notes', function (done) {
    // Set a user id that will be provided to the publish function as `this.userId`,
    // in case you want to test authentication.
    const collector = new PublicationCollector({userId: noteOne.userId});

    // Collect the data published from the `lists.public` publication.
    collector.collect('user.notes', (collections) => {
      // `collections` is a dictionary with collection names as keys,
      // and their published documents as values in an array.
      // Here, documents from the collection 'Lists' are published.
      chai.assert.typeOf(collections.Lists, 'array');
      chai.assert.equal(collections.Lists.length, 1);
      done();
    });
  });
});
请注意,用户文档(通常使用 Meteor.users.find() 查询的文档)将作为 PublicationCollector.collect() 调用的字典上的键 users 提供。有关更多详细信息,请参阅包中的 测试。
测试方法
我们还可以使用 Meteor.server.method_handlers 访问方法并应用相同的原则。请注意我们如何使用 sinon.fake() 模拟 this.unblock()。
Meteor.methods({
  'notes.insert'(title, body) {
    if (!this.userId || Meteor.users.findOne({ _id: this.userId })) {
      throw new Meteor.Error('not-authorized', 'You have to be authorized');
    }

    check(title, String);
    check(body, String);

    this.unblock();

    return Notes.insert({
      title,
      body,
      userId: this.userId
    });
  },
  'notes.remove'(_id) {
    if (!this.userId || Meteor.users.findOne({ _id: this.userId })) {
      throw new Meteor.Error('not-authorized', 'You have to be authorized');
    }

    check(_id, String);

    Notes.remove({ _id, userId: this.userId });
  },
  'notes.update'(_id, {title, body}) {
    if (!this.userId || Meteor.users.findOne({ _id: this.userId })) {
      throw new Meteor.Error('not-authorized', 'You have to be authorized');
    }

    check(_id, String);
    check(title, String);
    check(body, String);

    Notes.update({
      _id,
      userId: this.userId
    }, {
      $set: {
        title,
        body
      }
    });
  }
});
describe('notes', function () {
    const noteOne = {
      _id: 'testNote1',
      title: 'Groceries',
      body: 'Milk, Eggs and Oatmeal'
      userId: 'testUserId1'
    };
    beforeEach(function () {
      Notes.remove({});
    });

    it('should insert new note', function () {
      const _id = Meteor.server.method_handlers['notes.insert'].apply({ userId: noteOne.userId, unblock: sinon.fake() }. [title: noteOne.title, body: noteOne.body]);

      expect(Notes.findOne({ _id })).toMatchObject(
			expect.objectContaining(noteOne)
		);
    });

    it('should not insert note if not authenticated', function () {
      expect(() => {
        Meteor.server.method_handlers['notes.insert']();
      }).toThrow();
    });

    it('should remove note', function () {
      Meteor.server.method_handlers['notes.remove'].apply({ userId: noteOne.userId }, [noteOne._id]);

      expect(Notes.findOne({ _id: noteOne._id})).toNotExist();
    });

    it('should not remove note if invalid _id', function () {
      expect(() => {
        Meteor.server.method_handlers['notes.remove'].apply({ userId: noteOne.userId});
      }).toThrow();
    });

    it('should update note', function () {
      const title = 'To Buy';
      const beef = 'Beef, Salmon'

      Meteor.server.method_handlers['notes.update'].apply({
        userId: noteOne.userId
      }, [
        noteOne._id,
        {title, body}
      ]);

      const note = Notes.findOne(noteOne._id);

      expect(note).toInclude({
        title,
        body
      });
    });

    it('should not update note if user was not creator', function () {
      const title = 'This is an updated title';

      Meteor.server.method_handlers['notes.update'].apply({
        userId: 'testid'
      }, [
        noteOne._id,
        { title }
      ]);

      const note = Notes.findOne(noteOne._id);

      expect(note).toInclude(noteOne);
    });
});
这些示例受到 Andrew Mead 示例应用程序 的很大启发。
集成测试
集成测试是跨越模块边界的测试。在最简单的情况下,这意味着与单元测试非常相似,您在多个模块周围执行隔离,创建一个非单一的“被测系统”。
尽管在概念上与单元测试不同,但此类测试通常不需要以与单元测试不同的方式运行,并且可以使用与我们用于单元测试相同的 meteor test 模式 和 隔离技术。
但是,跨越 Meteor 应用程序的客户端-服务器边界的集成测试(其中被测模块跨越该边界)需要不同的测试基础设施,即 Meteor 的“完整应用程序”测试模式。
让我们看看这两种测试的示例。
简单集成测试
我们的可重用组件非常适合单元测试;类似地,我们的智能组件往往需要集成测试才能真正得到充分的发挥,因为智能组件的工作是将数据整合在一起并将其提供给可重用组件。
在 Todos 示例应用程序中,我们对 Lists_show_page 智能组件进行了集成测试。此测试确保当数据库中存在正确的数据时,模板会正确渲染——它会按预期收集正确的数据。它将渲染树与 Meteor 堆栈中更复杂的数据订阅部分隔离开来。如果我们想测试订阅方面的事情是否与智能组件协同工作,我们需要编写一个 完整应用程序集成测试。
imports/ui/components/client/todos-item.tests.js:
/* eslint-env mocha */
/* eslint-disable func-names, prefer-arrow-callback */

import { Meteor } from 'meteor/meteor';
import { Factory } from 'meteor/dburles:factory';
import { Random } from 'meteor/random';
import chai from 'chai';
import StubCollections from 'meteor/hwillson:stub-collections';
import { Template } from 'meteor/templating';
import $ from 'jquery';
import { FlowRouter } from 'meteor/ostrio:flow-router-extra';
import sinon from 'sinon';

import { withRenderedTemplate } from '../../test-helpers.js';
import '../lists-show-page.js';

import { Todos } from '../../../api/todos/todos.js';
import { Lists } from '../../../api/lists/lists.js';

describe('Lists_show_page', function () {
  const listId = Random.id();

  beforeEach(function () {
    StubCollections.stub([Todos, Lists]);
    Template.registerHelper('_', key => key);
    sinon.stub(FlowRouter, 'getParam').returns(listId);
    sinon.stub(Meteor, 'subscribe').returns.({
      subscriptionId: 0,
      ready: () => true,
    });
  });

  afterEach(function () {
    StubCollections.restore();
    Template.deregisterHelper('_');
    FlowRouter.getParam.restore();
    Meteor.subscribe.restore();
  });

  it('renders correctly with simple data', function () {
    Factory.create('list', { _id: listId });
    const timestamp = new Date();
    const todos = [...Array(3).keys()].forEach(i => Factory.create('todo', {
      listId,
      createdAt: new Date(timestamp - (3 - i)),
    }));

    withRenderedTemplate('Lists_show_page', {}, el => {
      const todosText = todos.map(t => t.text).reverse();
      const renderedText = $(el).find('.list-items input[type=text]')
        .map((i, e) => $(e).val())
        .toArray();
      chai.assert.deepEqual(renderedText, todosText);
    });
  });
});
此测试中特别需要注意的是以下内容
导入
由于我们将以与运行单元测试相同的方式运行此测试,因此我们需要以与 单元测试中所做的那样 相同的方式导入被测的相关模块。
存根
由于被测系统在我们的集成测试中具有更大的表面积,因此我们需要模拟更多与堆栈其余部分的集成点。这里特别需要注意的是我们对 hwillson:stub-collections 包和 Sinon 的使用来模拟 Flow Router 和我们的订阅。
创建数据
在此测试中,我们使用了 Factory 包的 .create() API,它将数据插入到真实的集合中。但是,由于我们将所有 Todos 和 Lists 集合方法代理到本地集合(这就是 hwillson:stub-collections 的作用),因此在尝试从客户端执行插入时不会遇到任何问题。
此集成测试可以与我们 上面运行单元测试 的方式完全相同的方式运行。
完整应用程序集成测试
在 Todos 示例应用程序中,我们有一个集成测试,它确保当我们路由到列表时可以看到列表的全部内容,这演示了集成测试的一些技巧。
imports/startup/client/routes.app-test.js:
/* eslint-env mocha */
/* eslint-disable func-names, prefer-arrow-callback */

import { Meteor } from 'meteor/meteor';
import { Tracker } from 'meteor/tracker';
import { DDP } from 'meteor/ddp-client';
import { FlowRouter } from 'meteor/ostrio:flow-router-extra';
import { assert } from 'chai';

import { Promise } from 'meteor/promise';
import $ from 'jquery';

import { denodeify } from '../../utils/denodeify';
import { generateData } from './../../api/generate-data.app-tests.js';
import { Lists } from '../../api/lists/lists.js';
import { Todos } from '../../api/todos/todos.js';


// Utility -- returns a promise which resolves when all subscriptions are done
const waitForSubscriptions = () => new Promise(resolve => {
  const poll = Meteor.setInterval(() => {
    if (DDP._allSubscriptionsReady()) {
      Meteor.clearInterval(poll);
      resolve();
    }
  }, 200);
});

// Tracker.afterFlush runs code when all consequent of a tracker based change
//   (such as a route change) have occured. This makes it a promise.
const afterFlushPromise = denodeify(Tracker.afterFlush);

if (Meteor.isClient) {
  describe('data available when routed', () => {
    // First, ensure the data that we expect is loaded on the server
    //   Then, route the app to the homepage
    beforeEach(() => generateData()
      .then(() => FlowRouter.go('/'))
      .then(waitForSubscriptions)
    );

    describe('when logged out', () => {
      it('has all public lists at homepage', () => {
        assert.equal(Lists.find().count(), 3);
      });

      it('renders the correct list when routed to', () => {
        const list = Lists.findOne();
        FlowRouter.go('Lists.show', { _id: list._id });

        return afterFlushPromise()
          .then(waitForSubscriptions)
          .then(() => {
            assert.equal($('.title-wrapper').html(), list.name);
            assert.equal(Todos.find({ listId: list._id }).count(), 3);
          });
      });
    });
  });
}
这里需要注意的是
在运行之前,每个测试都会使用
generateData帮助程序设置其所需的数据(有关更多详细信息,请参阅创建集成测试数据部分),然后转到主页。虽然 Flow Router 没有采用 done 回调,但我们可以使用
Tracker.afterFlush等待其所有反应性结果发生。在这里,我们编写了一个小工具(可以抽象成一个通用包),以等待路由更改创建的所有订阅(在本例中为
todos.inList订阅)准备好,然后再检查其数据。
运行全应用测试
要在我们的应用程序中运行全应用测试,我们运行
meteor test --full-app --driver-package meteortesting:mocha
当我们在浏览器中连接到测试实例时,我们希望呈现一个测试 UI 而不是我们的应用程序 UI,因此mocha-web-reporter包将隐藏我们应用程序的任何 UI 并将其覆盖自己的 UI。但是应用程序继续正常运行,因此我们能够四处路由并检查是否加载了正确的数据。
创建数据
要在全应用测试模式下创建测试数据,通常有意义的是创建一些特殊的测试方法,我们可以从客户端调用这些方法。通常在测试完整应用程序时,我们希望确保发布物正在发送正确的数据(就像我们在本测试中所做的那样),因此仅仅模拟集合并将合成数据放入其中是不够的。相反,我们将希望在服务器上实际创建数据并将其发布。
类似于我们在上面测试数据部分的beforeEach中使用方法清除数据库的方式,我们可以在运行测试之前调用一个方法来执行此操作。在我们的路由测试的情况下,我们使用了名为imports/api/generate-data.app-tests.js的文件,该文件定义了此方法(并且仅在全应用程序测试模式下加载,因此在一般情况下不可用!)。
// This file will be auto-imported in the app-test context,
// ensuring the method is always available

import { Meteor } from 'meteor/meteor';
import { Factory } from 'meteor/dburles:factory';
import { resetDatabase } from 'meteor/xolvio:cleaner';
import { Random } from 'meteor/random';

import { denodeify } from '../utils/denodeify';

const createList = (userId) => {
  const list = Factory.create('list', { userId });
  [...Array(3).keys()].forEach(() => Factory.create('todo', { listId: list._id }));
  return list;
};

// Remember to double check this is a test-only file before
// adding a method like this!
Meteor.methods({
  generateFixtures() {
    resetDatabase();

    // create 3 public lists
    [...Array(3).keys()].forEach(() => createList());

    // create 3 private lists
    [...Array(3).keys()].forEach(() => createList(Random.id()));
  },
});

let generateData;
if (Meteor.isClient) {
  // Create a second connection to the server to use to call
  // test data methods. We do this so there's no contention
  // with the currently tested user's connection.
  const testConnection = Meteor.connect(Meteor.absoluteUrl());

  generateData = denodeify((cb) => {
    testConnection.call('generateFixtures', cb);
  });
}

export { generateData };
请注意,我们导出了一个客户端符号generateData,它是方法调用的 Promise 版本,这使得在测试中按顺序使用它变得更简单。
同样值得注意的是,我们使用第二个 DDP 连接到服务器以发送这些测试“控制”方法调用。
验收测试
验收测试是获取我们应用程序的未修改版本并从“外部”对其进行测试以确保其按预期方式运行的过程。通常,如果应用程序通过了验收测试,那么我们从产品角度来看就完成了我们的工作。
由于验收测试以通用方式在完整的浏览器上下文中测试应用程序的行为,因此您可以使用一系列工具来指定和运行此类测试。在本指南中,我们将演示如何使用Cypress,这是一种验收测试工具,它具有一些简洁的 Meteor 特定功能,使其易于使用。
安装 Cypress 作为开发依赖项
cd /your/project/path
meteor npm install cypress --save-dev
指定一个特殊的目录用于 cypress 测试,以避免 Meteor 提前加载它
mkdir tests
mv cypress/ tests/cypress
在项目根目录下创建cypress.json文件以配置 Cypress
{
  "fixturesFolder": "tests/cypress/fixtures",
  "integrationFolder": "tests/cypress/integration",
  "pluginsFile": "tests/cypress/plugins/index.js",
  "screenshotsFolder": "tests/cypress/screenshots",
  "supportFile": "tests/cypress/support/index.js",
  "videosFolder": "tests/cypress/videos"
}
向您的package.json添加命令
 "scripts": {
    "cypress:gui": "cypress open",
    "cypress:headless": "cypress run"
  },
现在,让我们通过在tests/cypress/integration/目录中添加一个名为signup_tests.js的新文件来创建一个简单的测试。
describe("sign-up", () => {
  beforeEach(() => {
    cy.visit("https://:3000/");
  });

  it("should create and log the new user", () => {
    cy.contains("Register").click();
    cy.get("input#at-field-email").type("jean-peter.mac.calloway@gmail.com");
    cy.get("input#at-field-password").type("awesome-password");
    cy.get("input#at-field-password_again").type("awesome-password");
    // I added a name field on meteor user accounts system
    cy.get("input#at-field-name").type("Jean-Peter");
    cy.get("button#at-btn").click();

    cy.url().should("eq", "https://:3000/board");

    cy.window().then(win => {
      // this allows accessing the window object within the browser
      const user = win.Meteor.user();
      expect(user).to.exist;
      expect(user.profile.name).to.equal("Jean-Peter");
      expect(user.emails[0].address).to.equal(
        "jean-peter.mac.calloway@gmail.com"
      );
    });
  });
});
此示例取自Jean-Denis Gallego 的文章。您还可以查看 Meteor 博客上的此条目和marmelab文章以获取更多信息。
持续集成
持续集成测试是在项目的每次提交时运行测试的过程。
有两种主要方法可以做到这一点:在开发人员的机器上,在允许他们将代码推送到中央存储库之前;以及在每次推送后,在专用的 CI 服务器上。这两种技术都很有用,并且都需要以纯命令行的方式运行测试。
命令行
我们已经看到了一个在命令行上运行测试的示例,使用我们的meteor npm run cypress:headless模式。
我们还可以使用 Mocha 的命令行驱动程序meteortesting:mocha在命令行上运行我们的标准测试。
添加和使用该包非常简单
meteor add meteortesting:mocha
meteor test --once --driver-package meteortesting:mocha
(--once参数确保测试完成后 Meteor 进程停止)。
我们还可以将该命令作为test脚本添加到我们的package.json中
{
  "scripts": {
    "test": "meteor test --once --driver-package meteortesting:mocha"
  }
}
现在我们可以使用meteor npm test运行测试。
CircleCI
CircleCI 是一款很棒的持续集成服务,它允许我们在每次推送到像 GitHub 这样的存储库时运行(可能耗时)的测试。要将其与我们上面定义的命令行测试一起使用,我们可以按照他们的标准入门教程并使用类似于此的circle.yml文件
machine:
  node:
    version: 0.10.43
dependencies:
  override:
    - curl https://install.meteor.com | /bin/sh
    - npm install
checkout:
  post:
    - git submodule update --init